Course Learning Objectives
Upon completion of this course, students will be able to:
- CLO1 -- Grasp the core concepts and workflows of version control systems like Git .
- CLO2 -- Use Git commands to handle code repositories, including staging, committing, branching, and merging .
- CLO3 -- Work with remote repositories by cloning, pushing, pulling, and rebasing .
- CLO4 -- Apply tools like tagging, stashing, and cherry-picking for advanced tasks .
- CLO5 -- Review and adjust Git history for debugging, auditing, or undoing changes .
Lab Instructions / Rules
- Attendance is mandatory. Internal assessment and record marks are awarded in accordance with the college attendance policy.
- Bring your observation record for every lab session. Record your assigned system number and maintain your GitHub username securely.
- Save your work frequently and maintain backups in a folder named using your USN.
- Write clean, well-structured, and properly documented code. Add code comments when required
- Use a test repository to experiment with Git commands before applying changes to your assignment repository.
- Write meaningful commit messages, use feature branches whenever appropriate, and always fetch/pull the latest changes before pushing to a shared repository.
- Do not modify system settings, install unauthorized software, or access another student's files or GitHub account.
- Complete the assigned experiment during the scheduled lab session and submit the required files before the deadline.
What is Git?
Git is a distributed version control system created by Linus Torvalds in 2005. It tracks source code changes, allowing multiple developers to easily collaborate and maintain a history of edits .
Key Concepts
- Repository -- A directory holding project files and version history .
- Commits -- Snapshots of the project at a specific time .
- Branches -- Independent lines of work for new features or bug fixes .
- Merging -- Combining edits from different branches together .
- Remote Repositories -- Network-hosted project copies (e.g., GitHub, GitLab)[cite: 1].
- Cloning -- Downloading a remote repository to your local machine .
Why Do We Need Git?
- Version Control -- Keep a full history of all file changes .
- Collaboration -- Multiple people can work together without overriding each other's code .
- Branching -- Safely experiment or build features without breaking the main project .
- Distributed System -- Every user has a full project backup locally .
- Efficiency -- Git is fast because it only saves the actual changes made to files, not entire copies .
What is a Version Control System (VCS)?
A VCS tracks and manages file changes over time. It allows developers to collaborate while protecting the integrity of the codebase .
Main Types
- ▹ Centralized VCS -- Uses a single central server (e.g., SVN) .
- ▹ Distributed VCS -- Every user holds a complete copy of the repository (e.g., Git) .
The Git Lifecycle
The standard process for tracking code and collaborating :
- Initialize -- Start tracking a folder using git init .
- Working Directory -- Where you actively edit files .
- Staging -- Selecting files for the next commit using git add .
- Committing -- Saving a snapshot to the local repo using git commit .
- Branching & Merging -- Creating isolated work paths and later combining them[cite: 1].
- Push & Pull -- Syncing your local changes with a remote repository .
Configuration & Installation
Before using Git, you must install the latest stable version of Git for Windows. Git is a distributed version control system that helps you track changes in your source code, collaborate with others, and maintain a complete history of your projects.
Step 1: Download Visual Studio Code and git
Download the latest Visual Studio Code installer from the official website.
Download Visual Studio Code for WindowsDownload the latest 64-bit installer from the official Git website. Always download Git from the official source to ensure you receive the latest stable and secure release.
Download Git for Windows (Latest Stable Release)Step 2: Install Git
Run the downloaded installer and proceed through the installation wizard. Unless instructed otherwise by your instructor, the default installation settings are suitable for almost all users.
Recommended Installation Options
- ✔ Accept the license agreement.
- ✔ Install Git in the default location.
- ✔ Keep the default components selected.
- ✔ Choose Visual Studio Code as the default editor (if installed).
- ✔ Select Git from the command line and also from third-party software.
- ✔ Use the bundled OpenSSH.
- ✔ Use the bundled OpenSSL library.
- ✔ Checkout Windows-style, commit Unix-style line endings (recommended).
- ✔ Use MinTTY as the terminal (default).
- ✔ Enable Git Credential Manager.
- ✔ Enable file system caching.
- ✔ Click Install and wait for the installation to complete.
Step 3: Verify the Installation
After installation, open Command Prompt, PowerShell, Git Bash, or the integrated terminal in Visual Studio Code, and execute the following command:
git --version
If Git has been installed successfully, you should see output similar to:
git version 2.55.0.windows.1
Step 4: Configure Your Git Identity
Every Git commit records information about the author. Before creating your first repository, configure your global username and email address. These details become part of your commit history.
git config --global user.name "Your Full Name"
git config --global user.email "your.email@example.com"
Replace the values above with your own name and the email address associated with your GitHub account. Using the same email address as your GitHub account allows GitHub to correctly associate your commits with your profile.
Step 5: Verify Your Configuration
Confirm that your Git identity has been configured correctly by running:
                    git config --global user.name

                    git config --global user.email
Alternatively, display all global configuration settings using:
git config --global --list
- Using a different email address from your GitHub account.
- Typing user.name or user.email incorrectly.
- Forgetting to include quotation marks around names containing spaces.
- Not verifying the installation before proceeding with the lab exercises.
Common Git Commands
A quick reference list of widely used Git commands for tracking changes in software development projects :
- git init -- Initializes a new Git repository .
- git clone <url> -- Copies a remote repository to your local machine .
- git add <file> -- Stages a file for the next commit .
- git commit -m "msg" -- Saves staged changes with a descriptive message .
- git status -- Shows the status of your working directory and staged files .
- git log -- Displays a history of all previous commits[cite: 1].
- git diff -- Shows differences between the working directory and the last commit .
- git branch -- Lists all branches and highlights the current one .
- git branch <name> -- Creates a new branch .
- git checkout <branch> -- Switches to a different branch .
- git merge <branch> -- Merges a specified branch into your current one .
- git pull -- Fetches and merges changes from a remote repository .
- git push -- Uploads local commits to a remote repository[cite: 1].
- git remote -- Lists connected remote repositories .
- git fetch -- Retrieves remote changes without merging them .
- git reset <file> -- Unstages a file .
- git reset --hard <commit> -- Discards all changes and resets to a specific commit .
- git stash -- Temporarily saves uncommitted changes .
- git tag -- Lists and manages release tags .
- git blame <file> -- Shows who changed each line in a file and when .
- git rm <file> -- Deletes a file from the working directory and repository .
- git mv <old> <new> -- Renames a file and stages the change .
Experiment 1. Setting Up, Basic Commands, and Pushing to Remote
Task: Initialize a new Git repository in a directory. Create a new file, add it to the staging area, commit the changes with an appropriate commit message, and push it to a remote repository.
Solution Steps:
Understanding the process: Think of Git as a camera for your project. First, you turn the camera on (init). Then, you create your work (a file). Next, you put your work on a stage to get ready for the picture (add). You take the actual picture and label it (commit). Finally, you upload your picture album to the internet so it is safely backed up and others can see it (remote add and push).
- Open your terminal (or Git Bash) and navigate to the directory (folder) where you want to start your project.
- first make a folder: This command creates an empty folder
mkdir lab1 - get inside the new folder: This command cd stands for change directory
cd lab1 - Initialize the repository: This command creates a hidden folder called .git inside your current directory. This hidden folder is what turns
a normal, everyday folder into a Git repository that can track changes.
git init -
Create a new file: Instead of opening a text editor, you can create a file directly
from your terminal. The echo command prints text, and the > symbol pushes that text into a new file called my_file.txt.
Example programs and snippets
or use the below command to create a file using command prompt
echo "This is my very first Git experiment." > my_file.txt - Add the file to the staging area: Git doesn't track files automatically. The add command tells Git to place this specific file into the "staging
area," which is like a waiting room before the final save.
git add my_file.txt - Commit the changes: The commit command takes a
permanent snapshot of everything in the staging area. The -m flag
stands for "message". You must always wrap your descriptive
message in double quotes. This message acts as a historical record.
git commit -m "Add a new file called my_file.txt" - Connect to a Remote Cloud (GitHub): Before you can upload, you need to tell your
local Git where to send the files. First, create an empty repository on GitHub to get a URL.
Then, use the remote add command. We usually name this connection origin.
📸 Click here to see where to create a new repository on GitHub
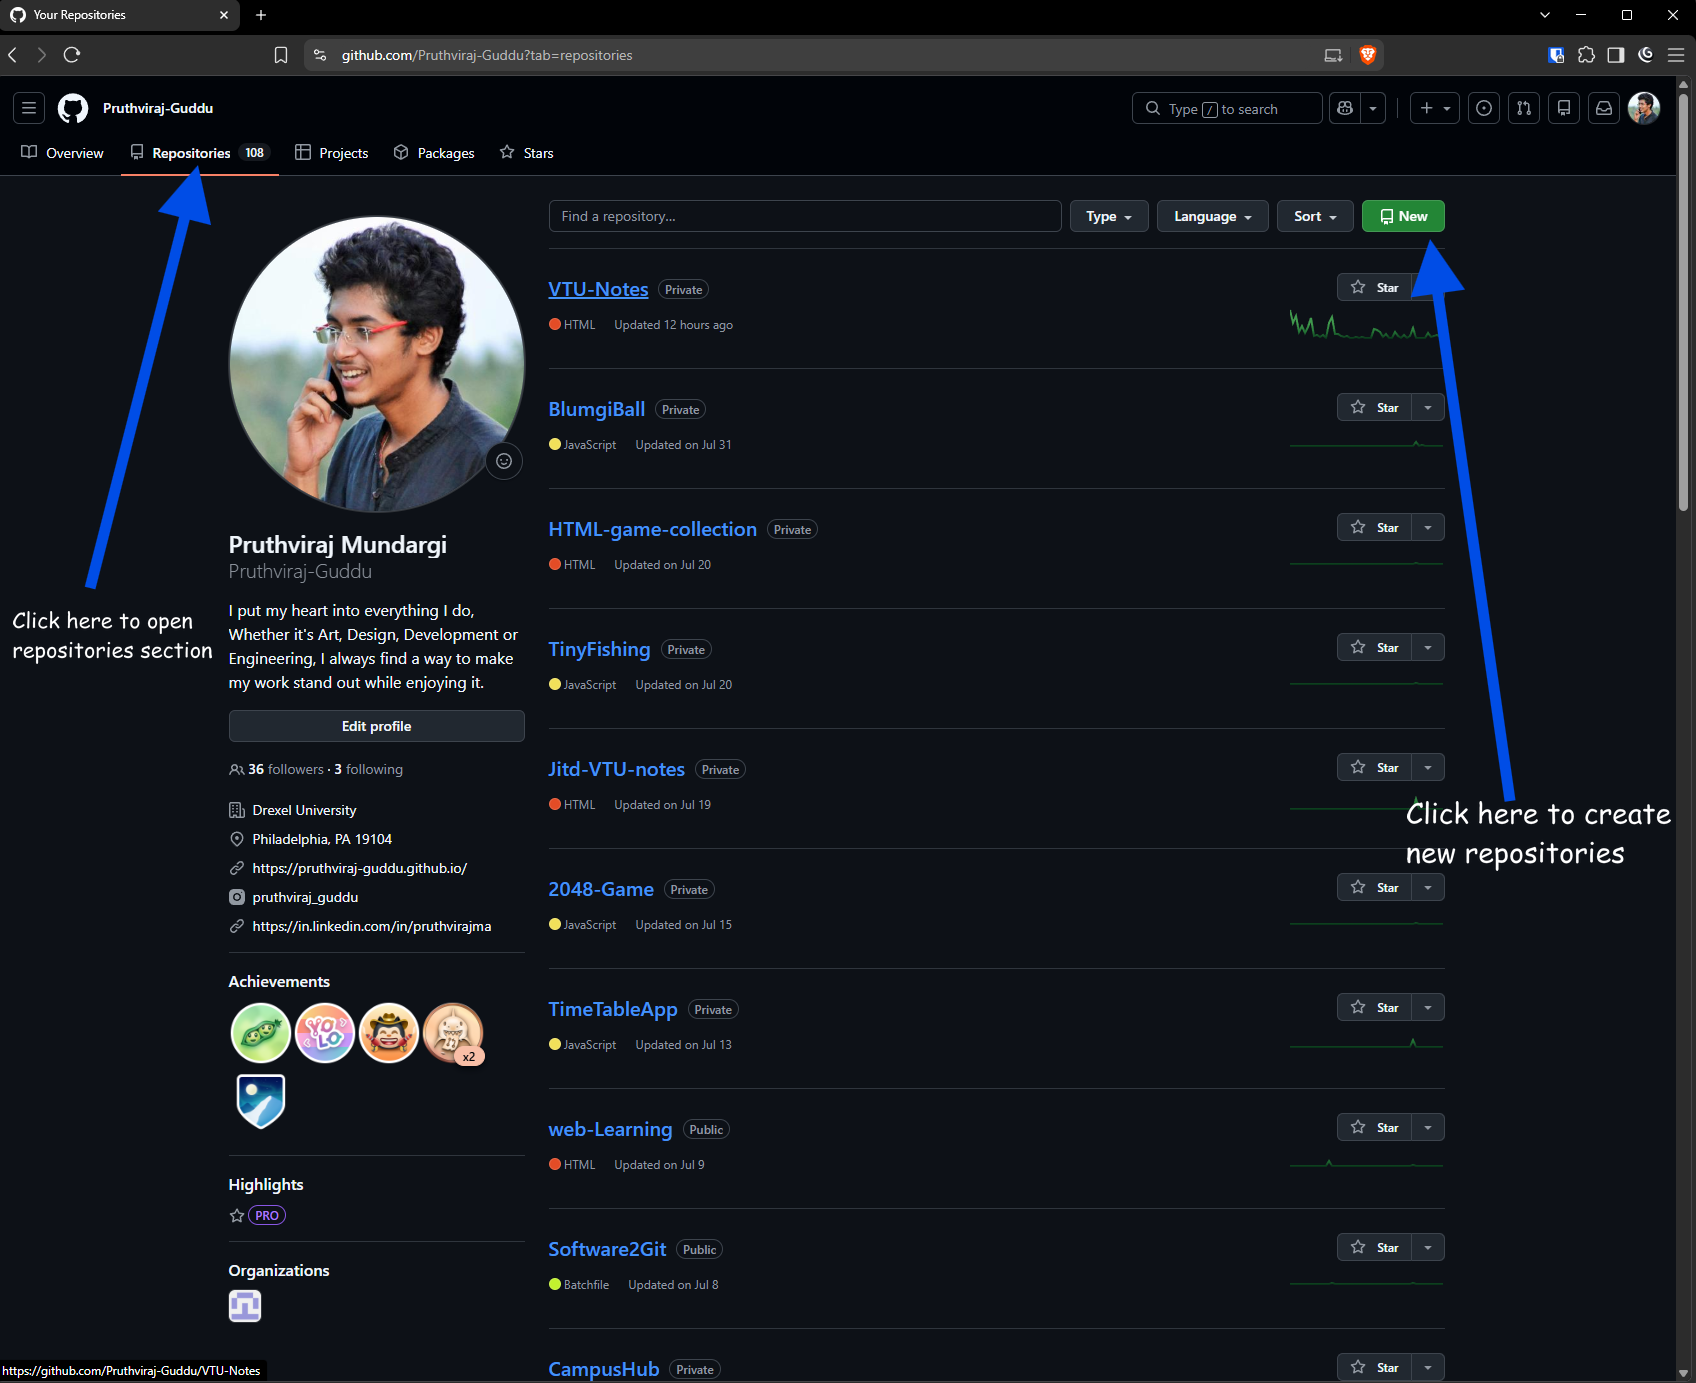
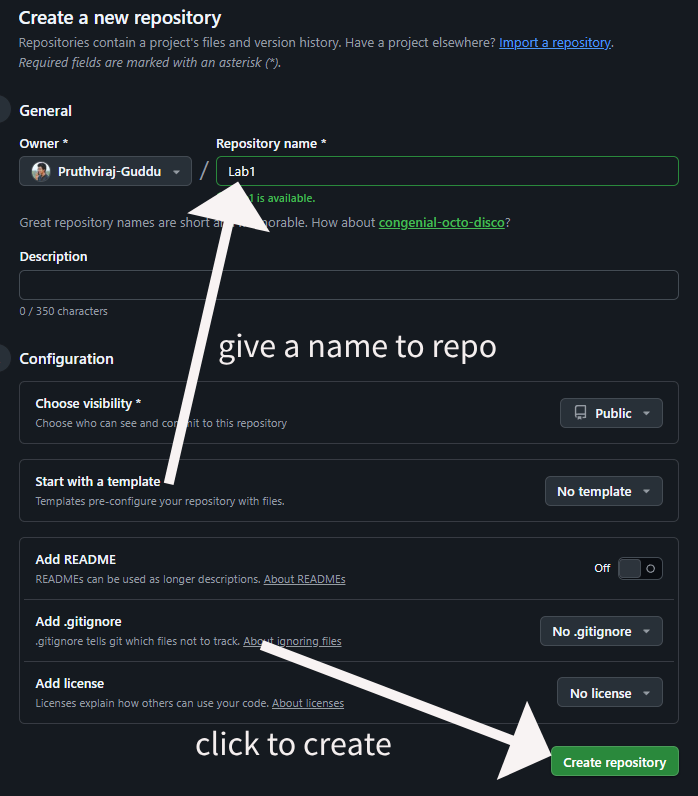
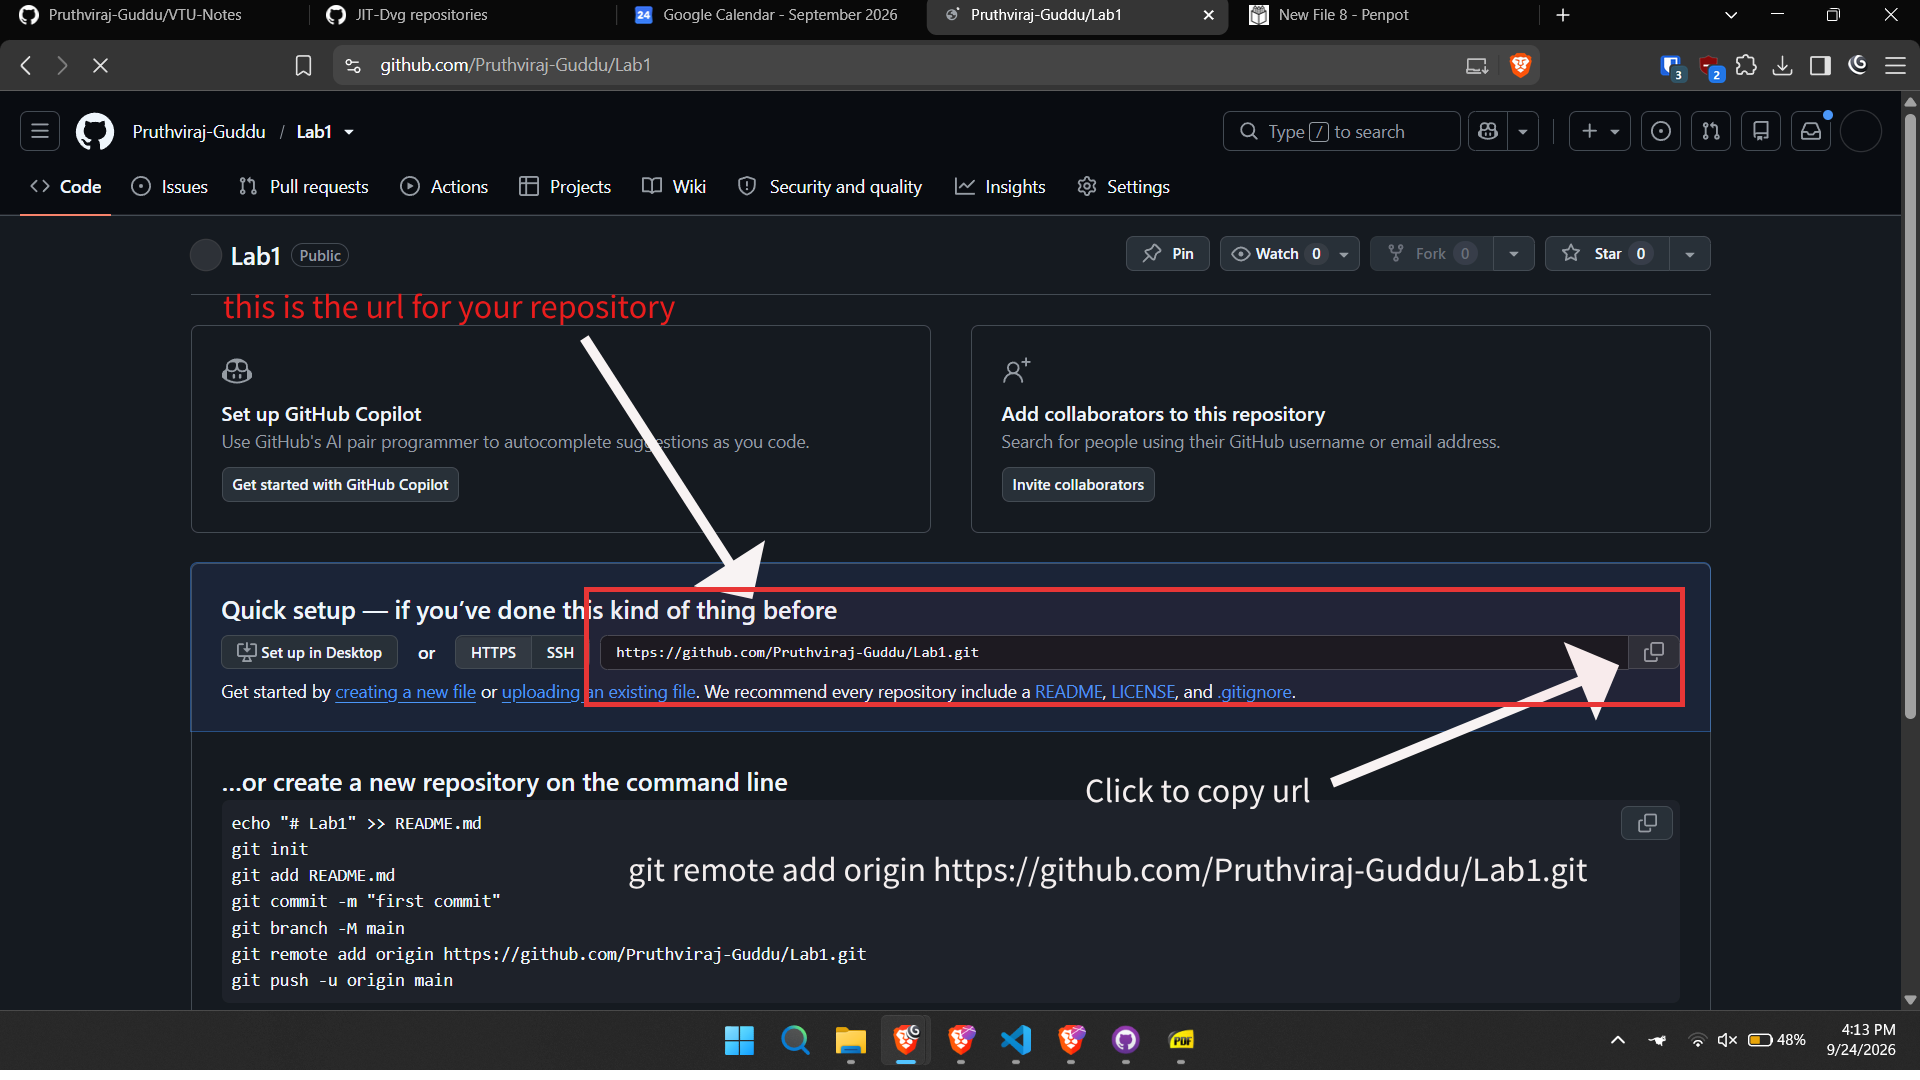
git remote add origin https://github.com/yourusername/your-repo-name.gitReplace the URL above with the actual link from your GitHub account.
- Push (Upload) your code: The push command uploads
your local snapshots to the remote cloud server. The -u
flag links your local branch to the remote branch so next time you can just type git push.
git push -u origin mainNote: If your default branch is "master", use git push -u origin master instead.
Experiment 2. Creating and Managing Branches
Task: Set up a new workspace for Lab 2, initialize a Git repository, create a new branch named "feature-branch", add some work, switch back to the main branch, and merge the feature branch.
Solution Steps:
Understanding the process: Branches allow you to create an isolated workspace. Imagine writing a rough draft of an essay on a separate piece of paper. Once you are sure it is perfect, you copy it onto your final, main document. That copying process is called "merging".
master instead of main after
initializing your repository, simply replace the word main with master in all
the commands below.
Git Bash, and
press Enter.
- Create a new folder for Lab 2:
mkdir lab2 - Navigate into the new folder:
cd lab2 - Initialize the repository: Turn this new folder into a Git repository.
git init - Make an initial commit: (Crucial step!) Git will not let you create new
branches until your main branch has at least one snapshot. Let's create a starting file and commit
it.
the below command is to create a new fileecho "Starting point for lab 2" > initial.txt
the below line is to add all the files for staginggit add .
below command is for saving the chanes madegit commit -m "Initial commit on main branch" - Create and switch to a new branch: Using the -b
flag tells Git to do two things at once: First, create a new branch named "feature-branch", and
second, immediately switch your active workspace to it.
git checkout -b feature-branch - Make changes, stage, and commit on the feature branch: Create a new file to
represent your new feature.
Example programs and snippets
echo "Building a new feature." > new_feature.txtgit add .git commit -m "Added new feature on feature-branch" - Switch back to the main workspace: Now that your feature is saved safely on its own
branch, travel back to the main timeline.
git checkout main - Merge the changes: The merge command reaches out
to the "feature-branch", grabs all the completed work you just did, and seamlessly combines it into
your current "main" branch.
git merge feature-branch - (Optional) Connect and Push to Remote: If you want to push this to GitHub, add your
remote origin and push.
git remote add origin https://github.com/yourusername/your-repo-name.git
git push -u origin main
Experiment 3. Creating and Managing Branches (Stashing)
Task: Set up a new workspace for Lab 3, initialize a Git repository, create some unfinished work, stash the changes, switch to a different branch, and then return to apply the stashed changes.
Solution Steps:
Understanding the process: Sometimes you are halfway through writing code, but you suddenly need to switch to another branch to fix an urgent bug. Because your code is unfinished, you shouldn't "commit" it yet. stash acts like a temporary clipboard. It sweeps your messy desk clean so you can switch branches, and lets you bring the mess back later when you are ready to finish.
- Create and enter a new folder for Lab 3:
                    mkdir lab3

cd lab3 - Initialize and make a base commit: Remember, you need at least one commit before
you can create other branches to switch to!
                    git init

                    echo "Base project file" > project.txt

                    git add .

git commit -m "Initial commit" - Create a second branch (for later): We will create a "bug-fix" branch but stay on
our current main branch for now.
git branch bug-fix - Start some messy work (Do NOT commit): Add some new unfinished text to a file.
                    echo "Half-written code..." > unfinished.txt

                    git add .
If you try to
git checkout bug-fixright now with uncommitted changes, Git might block you or carry the messy file over to the other branch! - Stash your current changes: This command takes your uncommitted modifications and
hides them away in temporary storage, leaving you with a clean working directory.
git stash save "Working on unfinished text" - Switch to the desired branch safely: Now that your workspace is clean, it is safe
to travel to the other branch.
git checkout bug-fixYou can do your bug fixes here. Let's pretend you finished them and are ready to go back.
- Switch back to your original branch: Let's go back to finish our half-written work.
git checkout main - check the saved stash: you can also get a list of all the stashes
git stash list - Apply the stashed changes: The pop command unpacks
the temporary clipboard, restores your half-finished work exactly as you left it, and deletes it
from the stash clipboard.
git stash pop
apply vs pop: git stash
pop restores the files AND deletes the stash from memory. git stash
apply restores the files but KEEPS a backup in the stash memory just in case. You can view
all saved stashes anytime by typing git stash list.
Experiment 4. Collaboration and Remote Repositories
Task: Clone a remote Git repository to your local machine.
Solution Steps:
Understanding the process: "Cloning" means downloading an exact, full copy of a project from a cloud server (like GitHub) onto your personal computer. It brings down every file, and every single historical snapshot ever taken.
- Open your terminal or command prompt.
- Navigate to your desired folder: Use the cd
(change directory) command to enter the folder where you want this project to live on your hard
drive.
mkdir lab4cd lab4 - Clone the repository: Type git clone followed by
the web address (URL) of the project. This command automatically creates a new folder,
downloads everything, and connects your local folder to the remote cloud server.
git clone https://github.com/Pruthviraj-Guddu/Web-Demon-Slayer-Card.git - Wait for Git to clone the repository to your local machine. Once complete, you will have a local copy in your chosen directory.
- To verify it worked: note that the repository you are trying to clone shoud be
either public or you should have permission to clone it
list out all the files
cd Web-Demon-Slayer-Carddir
Experiment 5. Collaboration and Remote Repositories
Task: Fetch the latest changes from a remote repository and rebase your local branch onto the updated remote branch.
Solution Steps:
Understanding the process: Imagine you and a friend are working on the same book. Your friend uploads new chapters to the cloud. You need those chapters, but you also wrote some of your own. fetch downloads your friend's chapters safely to the side. rebase takes your un-shared chapters, temporarily removes them, places your friend's chapters into your book, and then gracefully drops your chapters perfectly on top. This keeps the history straight and clean.
- Open your terminal or command prompt.
- Ensure you are in the correct branch: Switch to the local branch you are trying to
update. Replace <branch-name> with the actual name.
git checkout branch-name - Fetch the latest changes: The fetch command
contacts the cloud server (called origin by default) and downloads
all the new updates without forcefully mixing them into your current work files.
git fetch origin - Rebase your local branch: This command rewrites your local timeline. It tells Git:
"Make my branch look like it started *after* all these new updates from origin/<branch-name>".
git rebase origin/ branch-name - Handling conflicts: If Git gets confused because you and your friend edited the
exact same line of code, the rebase will pause. You must open the files, fix the text manually, save
them, and tell Git you are done by running the continue command.
git rebase --continue - Pushing the updated branch: Once the timeline is re-organized, you can upload your
work back to the cloud using push.
git push origin branch-name
Experiment 6. Collaboration and Remote Repositories
Task: Write the command to merge "feature-branch" into "main" while providing a custom commit message for the merge.
Solution:
Understanding the process: Normally, when you combine (merge) two branches, Git automatically generates a generic message like "Merge branch X into Y". By using the -m flag during a merge, you can write a specific, helpful message explaining exactly *why* these features are being combined.
To execute the merge with your own custom description, run these two commands exactly as shown:
                    git checkout main

                    git merge feature-branch -m "Your custom commit message here"
Experiment 7. Git Tags and Releases
Task: Write the command to create a lightweight Git tag named "v1.0" for a commit in your local repository.
Solution:
Understanding the process: A tag is like a permanent sticky-note or a bookmark in your project's history. While branch names move forward as you add new commits, a tag stays locked to one specific moment in time. This is incredibly useful for marking official releases (like Version 1.0) so you can easily find them later.
To tag the most recent snapshot in your current branch, use the tag command followed by the name of the tag:
git tag v1.0
If you forgot to tag a release and need to tag a specific, older commit, you must include its unique ID (the SHA-1 hash) at the end of the command:
git tag v1.0 commit-SHA
Replace <commit-SHA> with the actual hash of the commit.
Experiment 8. Advanced Git Operations
Task: Write the command to cherry-pick a range of commits from "source-branch" to the current branch.
Solution:
Understanding the process: What if a different branch has 10 commits, but you only want 3 specific ones? You don't want to merge the whole branch. cherry-pick allows you to pluck precise, specific commits out of one branch and copy them directly into your active branch.
Ensure you are on the target branch first, then use the following command structure to pick a range of commits. The two dots .. signify a range from a start point to an end point:
git cherry-pick start-commit ^.. end-commit
Example scenario:
If you want to pull in all commits starting from the ID ABC123 up through the ID DEF456, execute:
git cherry-pick ABC123^..DEF456
Experiment 9. Analysing and Changing Git History
Task: Given a commit ID, view the details of that specific commit, including the author, date, and commit message.
Solution:
Understanding the process: When you need to investigate who wrote a piece of code and when it was added, Git acts as a forensic tool. You have two main tools here: show gives you a massive, detailed read-out including the actual lines of code changed, while log can be configured to give you a short, easy-to-read summary.
You can use either git show for detailed changes or git log for a condensed view:
- Using git show (Detailed view): This outputs the author, date, message, and a
line-by-line breakdown (called a diff) of what was deleted or added in that specific snapshot[cite:
1].
git show commit-IDExample: git show abc123
- Using git log (Condensed view): The -n 1 flag
instructs Git to strictly limit the history log to exactly one (1) single commit matching your
ID.
git log -n 1 commit-IDExample: git log -n 1 abc123
Experiment 10. Analysing and Changing Git History
Task: List all commits made by the author "JohnDoe" between "2026-01-01" and "2026-12-31".
Solution:
Understanding the process: In large teams, the history log gets chaotic. Git allows you to filter the log like a search engine. By using "flags" (the commands starting with two dashes --), you can drill down to pinpoint exactly whose work you want to see, and within what specific timeline.
Use the git log command combined with the author and date range flags to filter the history perfectly:
git log --author="JohnDoe" --since=2026-01-01" --until="2026-12-31"
- --author filters out everyone except the specified name.
- --since sets the starting calendar date for the search.
- --until sets the cut-off calendar date for the search.
Experiment 11. Analysing and Changing Git History
Task: Display the last five commits in the repository's history.
Solution:
Understanding the process: Typing git log by itself will print the entire history of the project, which could be thousands of lines long and overwhelming. To save time and screen space, you can tell Git exactly how many recent snapshots you want to look at.
Use the git log command with the -n option (which stands for "number") to limit the output:
git log -n 5
You can adjust the digit after -n to display a different number of commits if needed.
Experiment 12. Analysing and Changing Git History
Task: Undo the changes introduced by the commit with the ID "abc123".
Solution:
Understanding the process: Mistakes happen. However, in Git, deleting past history is extremely dangerous, especially if others are working on the same project. Instead of deleting the bad code, revert looks at what was added in that mistake, and automatically generates a brand-new commit that does the exact mathematical opposite (e.g., if a file was added, revert deletes it). This fixes the error while keeping the permanent historical record intact.
Use the git revert command to create a new commit that safely reverses the changes:
git revert abc123